Working with Multiple Project Baselines
I wrote a guest post about multiple project baselines for Erik Van Hurck’s blog, The Project Corner. Follow the link to learn about the contest we’re running: we’re giving away two copies of my books. Here’s the post:
A baseline is the key to staying on top of where your project is compared to where it should be. When you set a baseline in Project (you can set up to 11), the program takes a snapshot of schedule and cost values, which you can then use to see how current values compare to what you originally planned. What can you do with Project’s baselines? And how do you view them when you have more than one?
Saving more than one baseline comes in handy in several situations. Suppose you incorporate a big change request into your project plan. Keeping your original baseline is a good idea, especially when you want to answer stakeholder questions about why the big difference from the original dates and cost. At the same time, you can use the new baseline with the change request to track performance for the plan with the change request in place.
An additional baseline might be called for when a project experiences other types of changes: stakeholders dramatically increase or decrease the project scope or a higher priority project puts yours temporarily on hold. The original baseline values no longer produce meaningful variances, so you need a new baseline that reflects the revised schedule and cost.
Multiple baselines can also help document trends over time. Suppose your project has fallen behind schedule and you implement a recovery strategy. You can keep the original baseline, but set a new one using the values in place before you start the recovery. That way, you can compare your original variances to recovery variances to see whether your course correction is helping. Another way to evaluate trends is to add baselines at key points in a project, such as at every fiscal quarter or perhaps at the end of each phase.
Setting Multiple Baselines
If you’re going to use multiple baselines, it’s a good idea to store a second copy of your original baseline, for example, to Baseline 1 fields. That way, you have a copy of the original baseline for posterity. At the same time, you can keep your most recent baseline in Project’s Baseline fields, so it’s easy to see the variances from your most recent baseline in the default Variance fields.
Here’s how to set multiple baselines while easily keeping track of variances for the most recent one:
- Head to the Project tab’s Schedule section, and choose Set Baseline –> Set Baseline. The Set Baseline dialog box opens.
- In the “Set baseline” drop-down list, save your first baseline by choosing Baseline1.
- Make sure the “Entire project” option is selected. This option saves baseline values for the entire project, which is what you want the first time around.
- Click OK. Project stores the current values for start, finish, duration, work, and cost in the corresponding fields, such as Baseline1 Start, Baseline1 Finish, Baseline1 Duration, Baseline1 Work, and Baseline1 Cost.
- Immediately repeat steps 1 through 4 to save the original baseline a second time, but this time as Baseline.
When you open the Set Baseline dialog box after saving at least one baseline, the “Set baseline” drop-down list shows the last saved date for the baseline. For example, baselines that have been set have “(last saved on mm/dd/yy)” appended to the end of their names, where mm/dd/yy is the last saved date for that baseline.
If you try to set a baseline that has already been saved, Project warns you that the baseline has been used and asks if you want to overwrite it. Click Yes to overwrite the baseline’s existing values (for example, if you’ve used up all 11 baselines and want to reuse an older one). If you don’t want to overwrite it, click No, and then, back in the Set Baseline dialog box, select a different baseline.
When you’re ready to save another baseline, here’s what you do:
- In the Project tab’s Schedule section, choose Set Baseline –>Set Baseline.
- In the “Set baseline” drop-down list, choose Baseline2 to permanently save the second baseline. Make sure the “Entire project” option is selected, and then click OK.
- Immediately save the current project schedule again as Baseline. That way, The Variance fields like Start Variance, Finish Variance, and Cost Variance show the variances between your current values and those for your most recent baseline.
Note: For each additional baseline, save the project schedule once as Baseline and once as the next empty baseline.
Viewing Multiple Baselines
When you want to compare your current progress to your most recent baseline, Tracking Gantt view is perfect. It shows colored task bars for the current schedule above gray task bars for the baseline start and finish dates.
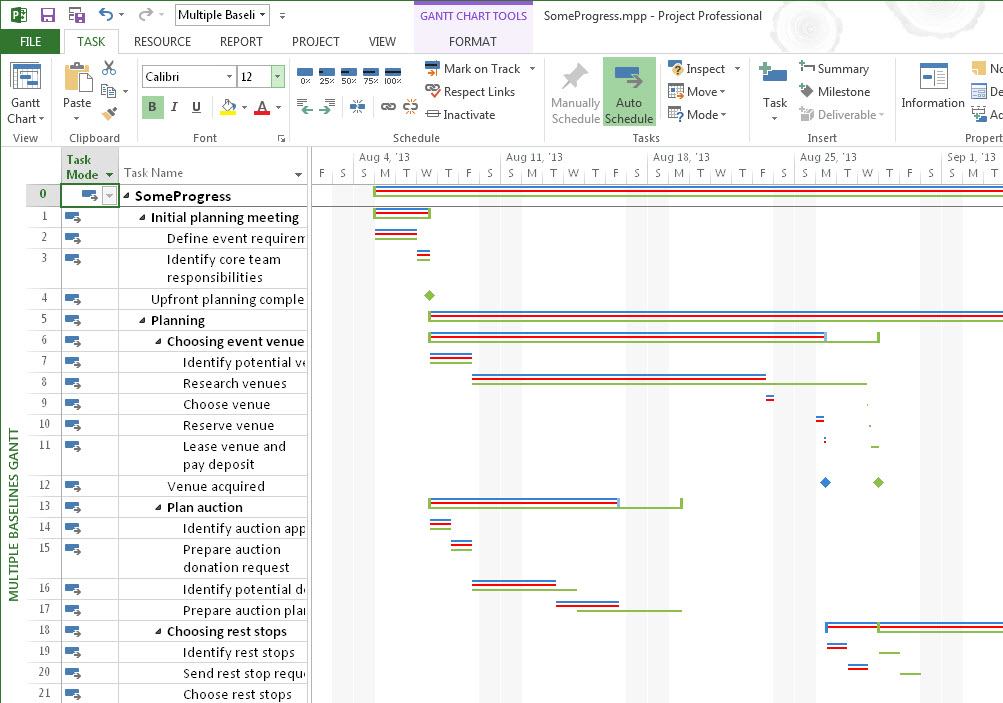
However, if you save more than one baseline, you may want to view them simultaneously so you can compare performance from one to the next. Multiple Baselines Gantt view displays different color task bars for Baseline, Baseline 1, and Baseline 2. To display this view, in the View tab’s Task Views section, choose Other Views –>More Views. In the More Views dialog box, double-click Multiple Baselines Gantt. Multiple Baselines Gantt shows task bars for only Baseline, Baseline1, and Baseline2. It doesn’t display task bars for the current schedule.
To see different baselines or more baselines, you can modify your view in several ways. From the ribbon, you can display any baseline you want in any Gantt Chart view. Display the Gantt Chart view you want and then choose the Format tab. In the Bar Styles section, click the Baseline down arrow, and then choose the baseline you want to display. For example, if you display Tracking Gantt view, by default it uses Baseline for the baseline task bars. However, if you choose Baseline2 in the Format tab’s Bar Styles Baseline menu, the baseline task bars reflect Baseline2’s dates.
But what if you want a view to show task bars for Baseline1 through Baseline4 to evaluate trends over time? In that case, you can modify the view definition to do just that.
- Copy Multiple Baselines Gantt view and give it a name like FourBaselines. (With Multiple Baselines Gantt view displayed, in the View tab’s Task Views section, choose Other Views –>More Views. In the More Views dialog box, click Copy, type a new name in the Name box, and then click OK. Back in the More Views dialog box, click Close.
- On the Gantt Chart Tools | Format tab, in the Bar Styles section, click Format –>Bar Styles. The Bar Styles dialog box opens.
- Select the row for the task bar you want to duplicate (for example, Baseline2), and then click Cut Row.
- Before you do anything else, click Paste Row to insert the cut row back where it was originally.
- Select the row below where you want to insert the copied row, and then click Paste Row again. Project inserts another copy of the row immediately above the row you selected.
- Edit the new row’s Name, From, and To cells to match the baseline you want to show. For example, to display Baseline3, change the name to include Baseline3, and then, in the From and To cells, choose Baseline3 Start and Baseline3 Finish, respectively.
- On the Bars tab in the lower half of the Bar Styles dialog box, choose the shape and color you want for the bar. Baseline1, Baseline2, and Baseline3 already use red, blue, and green, so choose a color like teal, orange, or purple. In the Shape box, choose a top, middle, or bottom narrow bar.
- If you’re including more than three baselines in Multiple Baselines Gantt view, you have to add a second task bar row to the view. In the Bar Styles dialog box, in the task bar’s Row cell, type 2 to tell Project to place the baseline’s task bar on a second row in the Gantt Chart.
- Repeat steps 3 through 8 to create task bars for split, milestone, and summary tasks for the baseline.
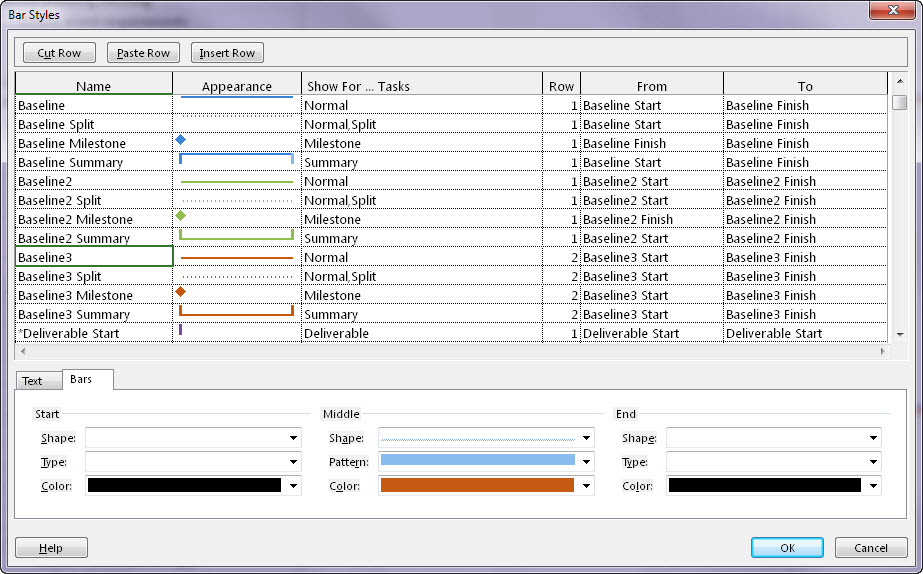
Here’s what the bar styles definitions look like when you add another baseline to the view:
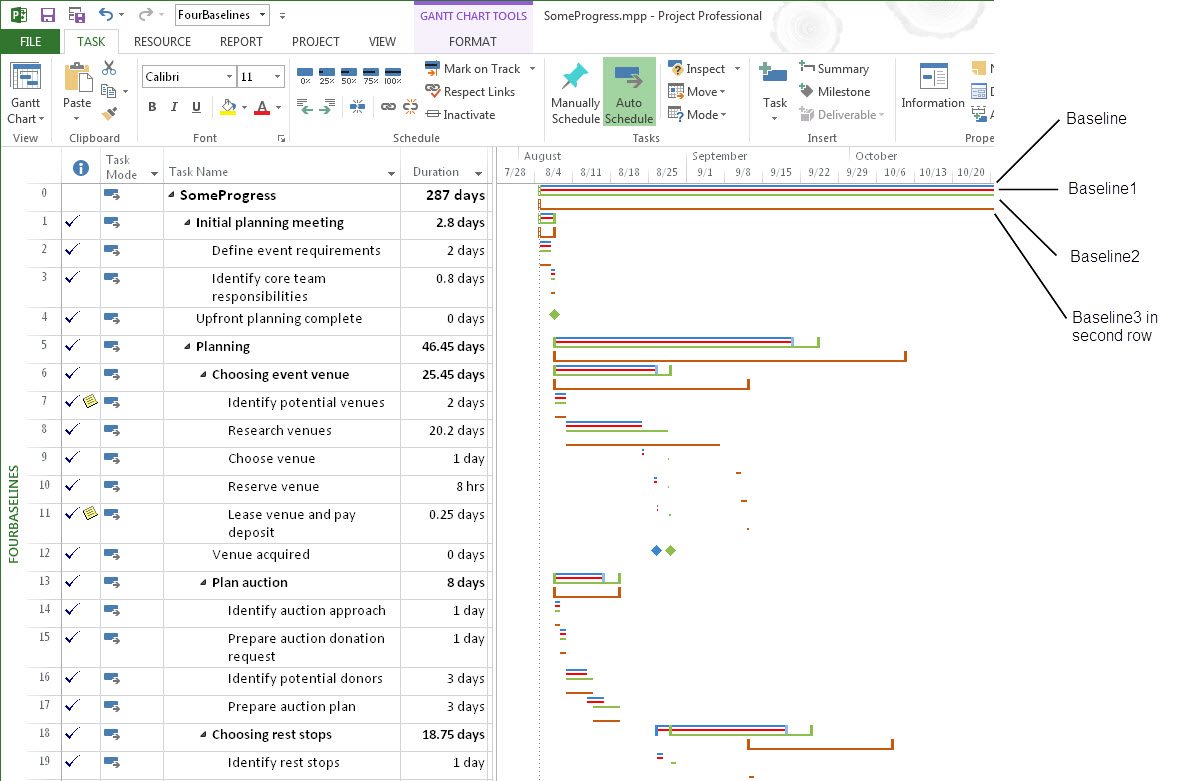
And here’s what the view looks like with more than three sets of baseline bars.
What About Interim Plans?
The Set Baseline dialog box has a second option: “Set interim plan.” Unlike Project baselines, interim plans save only start and finish dates, not duration, cost, and work. Interim plans are a holdover from earlier Project versions, when the program offered only one baseline.
Even with the 11 baselines that Project now offers, interim plans may come in handy. If you import a project schedule from Project 2002 and earlier (it could happen), any additional baseline information ends up in interim plan fields (Start1/Finish1 through Start10/Finish10). You can copy that data from the interim plan Start and Finish fields (Start2/Finish2, for example) into baseline fields like Baseline2.You can also save interim plans as partial baselines in between the full baselines you save.
Don’t forget: for a chance to win a copy of one of my books, visit Erik Van Hurck’s blog, The Project Corner.


