When might you start a project without a business case?
While I was in Australia, Bob McGannon and I talked about when, if ever, you would start a project without a business case. It was a fun discussion. Click here to watch!
While I was in Australia, Bob McGannon and I talked about when, if ever, you would start a project without a business case. It was a fun discussion. Click here to watch!

I spent some time in Australia with my good friend and project manager/LinkedIn Learning author extraordinaire, Bob McGannon. We talked about several interesting questions in the project management and leadership domain. Check out the video of our discussion!
How long should you proceed with your project without validating assumptions?
Assumptions about a product’s or idea’s marketability should be validated quickly. Money spent on a product with unvalidated marketability is at risk. Share product specifications, drawings, or a mock-up built with Legos, but produce a prototype to validate your product’s marketability.
Key stakeholder assumptions about funding or staffing should also be validated quickly. Get with your stakeholders early and convert assumptions into commitments.
Assumptions about the availability or capability of a product you need are sometimes critical to confirm, sometimes not. If the product is unique, confirm your assumption ASAP. If there are alternatives, the assumption can probably wait.
Assumptions about government legislation, licensing or approvals can be tricky.Often, they’re a make or break proposition for your project. Unfortunately, you only know what you’re dealing with after the government passes a law (or not) or grants a license. Plan your project around these approval events, and weigh the risks of working before you fully understand the government’s decision.
Assumptions about data being available to support your project is important to resolve early. For example, you might obtain a new software system that depends on critical data to operate properly. Purchasing that system before validating that the required data is available is VERY high risk. Determine how to obtain and determine the accuracy of that data as soon as possible.
Project assumptions can be broad and varied. What inaccurate assumptions have you heard about that created issues? Share those in the comments section so we can all learn together!
The answer depends on what makes you uncomfortable.
The project business case forms the basis of the project. Get it wrong and the likelihood of a successful project is low.
If you believe the business case data lacks integrity, discuss this with your sponsor immediately. Contrast your information with what’s in the business case and work through the differences. The business case sets expectations, so you’ll eventually need to compare project outcomes against the business case. Don’t wait until the end of the project to challenge the business case. Take action now!
If you’re concerned with risk in the business case, seek to understand your sponsor’s risk profile. As a project manager, part of your role is to ensure your sponsor and key stakeholders understand the project risks. Your role is NOT to ensure risk goes away, When you’re concerned with business case risk, point out the risks to stakeholders and establish response plans. When you understand the risks your sponsor is comfortable and uncomfortable with, you can perform risk management effectively.
If the business case was not built collaboratively, review the business case with key stakeholders. They usually focus on their own interests and perceptions of risk and may be uncomfortable with the business case or its approaches. Discussions to analyze and align the business case with key stakeholders are critical. Moving forward with a business case that hasn’t been reviewed and agreed upon makes it difficult to get staffing and decision-making support.
Proactively addressing issues in the business case will help you deliver your project successfully as well as establish your authority with project stakeholders.
Projects are risky by definition! You are trying to create something that has never been created before. Some executives find this uncomfortable and request a feasibility study to determine whether the project is viable. It’s a smart thing to do: it helps you build a good initial scope statement and project charter. However, if the feasibility study is supposed to create certainty about the project outcome – meaning no risk – you’ve got a problem. Here are some tips if you find yourself in this situation.
As a project manager no two days are the same. Business changes, project dynamics, and the myriad stakeholders you deal with are just the beginning. For daily entertainment, here are a few additional project management skills you must develop and deploy to be effective:
When managing small projects, less is more. A small project needs to be a lean machine, and unnecessary work and inefficiency gum up the works. Here are five tips to make your small projects run more smoothly.
Tip #1: Small projects often have tight budgets and short durations. There’s no room for unnecessary steps or nice-to-have deliverables.
Hash out what the customer really wants (project scope) – and put it in writing. Don’t forget to document what isn’t in scope. Say you’re building a web site for your customer. In a meeting with the customer, you develop the following scope:
Scope
Out of scope
After you nail down scope, be sure to balance the project triple constraints (scope, time, and budget). Are the desired timeframe and budget realistic relative to the project scope? If not, work with the customer to identify an acceptable compromise: maintain scope and increase the time or budget, trim the scope, or some other combination.
Tip #2: Do just enough to make the project a success.
This tip might sound contra-intuitive, but your goal as project manager is to complete the project successfully. That means delivering what the project is supposed to – not to exceed expectations. Make sure your team works on just the work that’s required and don’t address other objectives or nice-to-have deliverables.
Tip #3: Build an effective team and keep it that way.
If you have a choice, use people who know how to do the kind of work the project requires, and ideally who have worked well together in the past. Good teamwork is important. People who work well together might get more done, even if they are a little less experienced.
Make sure your team knows what to do and help clear the way, so they can get their work done.Keep your team members motivated. Help them understand how they contribute to project success and make them feel appreciated.
Tip #4: Keep things simple.
Time, money, and resources can be hard to come by on small projects. Don’t squander them by over-complicating things. Use simple processes and procedures for tracking time, managing changes, communicating, and so on. Ask for only the information you need to manage the project and hold only the meetings that are necessary.
Tip #5: Keep things organized.
You can’t afford to waste time looking for information, performing work that someone else already finished, or redoing work because the instructions weren’t complete or clear.Good organization also helps everyone else find what they need.Store project information where it’s easy to get to by everyone who needs it.
For more tips on managing small projects, check out my updated course, Project Management Foundations: Managing Small Projects.
The schedule logic for a project is the collection of dependencies you create between activities. The goal of this schedule logic is to provide a realistic model of when project activities should occur. Want to up your scheduling game? This article explains when to use each dependency type to link activities.
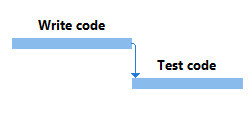
Finish-to-start is the one you’ll use most often. A finish-to-start dependency tells you that when one activity (called the predecessor) finishes, the next activity (the successor) can start. For example, you have to finish writing some code before you can test it. If you don’t work in software, maybe this example will resonate: when your older child teases the younger one, the younger one starts crying.
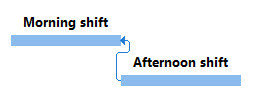
On the other hand, the start-to-finish dependency type is rare (which is a gift because it’s also confusing). This dependency means that the start of one activity determines when another one finishes. It’s confusing because the predecessor occurs later than the successor, as shown in the figure, and most people think of predecessors occurring before successors. (Remember, with dependencies, the predecessor is the activity that controls the timing of the successor, not when it occurs time-wise.) For example, consider a sales clerk who works a shift in a retail store. To keep the store open for customers, the clerk for the next shift has to show up to start his or her shift before the sales clerk on duty can go home (finish the shift).
Let’s look at the remaining two dependency types: start-to-start and finish-to-finish.
Suppose one person is scheduled to spend 10 days writing software documentation and another one is scheduled to work 10 days reviewing the documentation to make sure it’s accurate and clear. At first glance, you might think start-to-start and finish-to-finish dependencies work equally well. When the writing starts, the review could start almost immediately. Or, when the writing is complete, the review could finish soon after.
But start-to-start dependencies can cause trouble if activities don’t occur as scheduled. Suppose the writer runs into issues with the software and the writing task is going to take 15 days instead of 10. As you can see in the figure, the writing and review started at the same time, which means that the review is scheduled to finish 5 days before the writing. Some of the writing wouldn’t get reviewed unless you caught this error in your schedule logic.

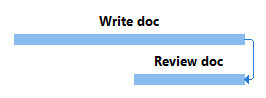
The writing and review activities should be linked with a finish-to-finish dependency. That way, the schedule logic guarantees that the review doesn’t finish until the writing is complete, even if the writing takes longer. This dependency also works if the review takes less time than writing—say, 5 days. With finish-to-finish, you could wait 5 days before starting to review documentation, as shown in the figure below. If the writing takes longer than you expect, the delayed finish date for writing also delays the finish for review.
As you can see, almost all your dependencies will be finish-to-start or finish-to-finish. Another dependency best practice is to avoid negative lag (also called lead), because it implies that you know when the predecessor activity will finish. (You can explore this practice in this movie from my revamped and updated course, Project Management Foundations: Scheduling, which was released in April 2018).
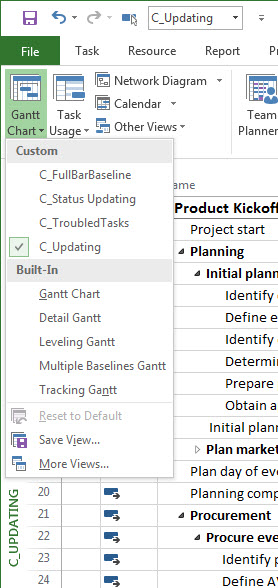
Saving custom views is easy when you plan ahead. Modifying a built-in view and then saving it as a custom view is still easy, but it does take a few more steps.
If you set out to save a customized view to use again and again, the steps are easy:
1. Display the built-in view that’s closest to what you want, like the Detail Gantt view.
2. On the Task tab or View tab, click the bottom half of the Gantt Chart button, and then choose Save View.
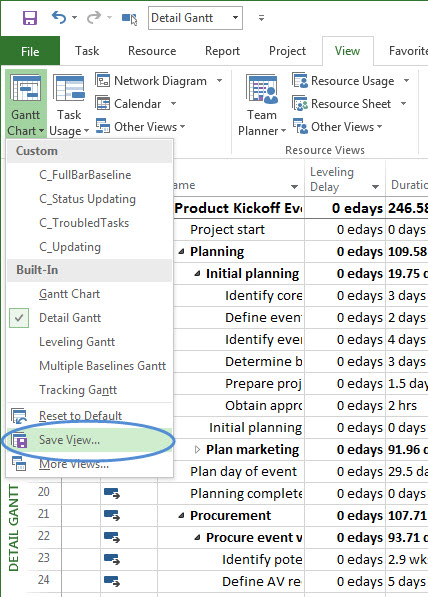
3. In the Save View dialog box, name the view, for instance, C_Updating, and then click OK.
I like to add C_ at the beginning of each custom view, so they’re easy to spot in drop-down lists and in the global template.
Project creates the new view and a new table (C_Updating Table1) to go with it.
4. Now you can customize the view and table however you want.
The custom view is available to use in the future – and the original built-in view is still available.
What if you display a built-in Project view and go wild building a super-cool customized view with filters, groups, timescale settings, table columns, and formatting? THEN you realize you want your creation to be a custom view and you want the original built-in views definition back. No biggie. A few more steps get you where you want to be.
Suppose you want a view for updating tasks. You’ve displayed the built-in Tracking Gantt view, applied the In Progress Tasks filter, set the timescale to days, and added and rearranged columns in the table. Remember, when you modify a built-in view, Project saves copies of the modified view and table in your Project file (using the built-in view and table names). The global template still contains the original built-in definition of the view and table.
Here’s what you do to save the modified view as a new one and bring back the original built-in view:
1. On the View tab, click the bottom half of the Gantt Chart button (or any other view button like Task Usage or Resource Usage), and then choose Save View.
2. In the Save View dialog box, name the view, like C_TaskUpdating, and then click OK.
Just like saving a view before you add all the modifications, Project saves the new view and a new table, in this example, C_TaskUpdating for the view and C_TaskUpdating Table 1 for the table. If you have the “Automatically add new views, tables, filters, and groups to the global” option turned on (it’s in the Project Options dialog box Advanced category), Project also saves the new view and table to your global template.
3. To get the built-in view (Tracking Gantt in this example) back to its original definition, click the bottom half of the Gantt Chart button (or the appropriate view button on the View tab) and choose the built-in view.
4. Click the bottom half of the Gantt Chart button (or other view button) again. This time, on the drop-down menu, choose Reset to Default.
5. When the message appears telling you that you are about to revert to the view from your global template, click Yes.
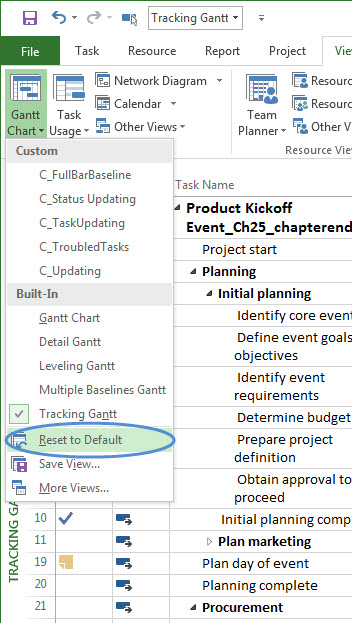
Now, you have your new view with all its customization, and your built-in view is back to the original definition.
On another note, what if other team members need access to your project along with your custom view handiwork but don’t have Microsoft Project? You might want to check out Microsoft Project Viewer.
I wrote a guest post about multiple project baselines for Erik Van Hurck’s blog, The Project Corner. Follow the link to learn about the contest we’re running: we’re giving away two copies of my books. Here’s the post:
A baseline is the key to staying on top of where your project is compared to where it should be. When you set a baseline in Project (you can set up to 11), the program takes a snapshot of schedule and cost values, which you can then use to see how current values compare to what you originally planned. What can you do with Project’s baselines? And how do you view them when you have more than one?
Saving more than one baseline comes in handy in several situations. Suppose you incorporate a big change request into your project plan. Keeping your original baseline is a good idea, especially when you want to answer stakeholder questions about why the big difference from the original dates and cost. At the same time, you can use the new baseline with the change request to track performance for the plan with the change request in place.
An additional baseline might be called for when a project experiences other types of changes: stakeholders dramatically increase or decrease the project scope or a higher priority project puts yours temporarily on hold. The original baseline values no longer produce meaningful variances, so you need a new baseline that reflects the revised schedule and cost.
Multiple baselines can also help document trends over time. Suppose your project has fallen behind schedule and you implement a recovery strategy. You can keep the original baseline, but set a new one using the values in place before you start the recovery. That way, you can compare your original variances to recovery variances to see whether your course correction is helping. Another way to evaluate trends is to add baselines at key points in a project, such as at every fiscal quarter or perhaps at the end of each phase.
If you’re going to use multiple baselines, it’s a good idea to store a second copy of your original baseline, for example, to Baseline 1 fields. That way, you have a copy of the original baseline for posterity. At the same time, you can keep your most recent baseline in Project’s Baseline fields, so it’s easy to see the variances from your most recent baseline in the default Variance fields.
Here’s how to set multiple baselines while easily keeping track of variances for the most recent one:
When you open the Set Baseline dialog box after saving at least one baseline, the “Set baseline” drop-down list shows the last saved date for the baseline. For example, baselines that have been set have “(last saved on mm/dd/yy)” appended to the end of their names, where mm/dd/yy is the last saved date for that baseline.
If you try to set a baseline that has already been saved, Project warns you that the baseline has been used and asks if you want to overwrite it. Click Yes to overwrite the baseline’s existing values (for example, if you’ve used up all 11 baselines and want to reuse an older one). If you don’t want to overwrite it, click No, and then, back in the Set Baseline dialog box, select a different baseline.
When you’re ready to save another baseline, here’s what you do:
Note: For each additional baseline, save the project schedule once as Baseline and once as the next empty baseline.
When you want to compare your current progress to your most recent baseline, Tracking Gantt view is perfect. It shows colored task bars for the current schedule above gray task bars for the baseline start and finish dates.
![]()
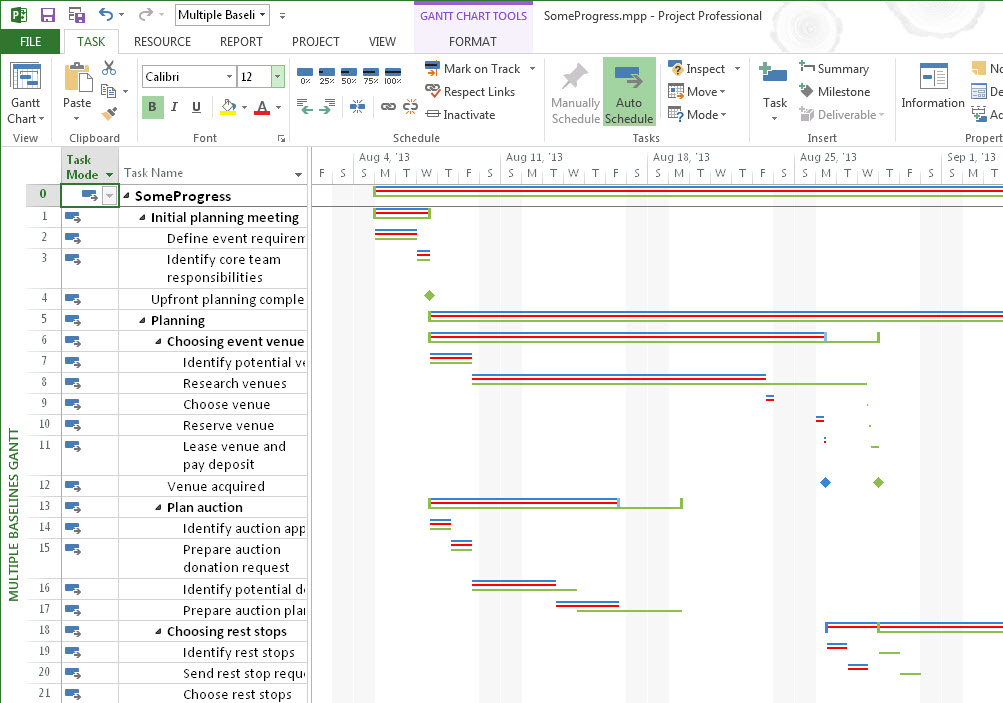
However, if you save more than one baseline, you may want to view them simultaneously so you can compare performance from one to the next. Multiple Baselines Gantt view displays different color task bars for Baseline, Baseline 1, and Baseline 2. To display this view, in the View tab’s Task Views section, choose Other Views –>More Views. In the More Views dialog box, double-click Multiple Baselines Gantt. Multiple Baselines Gantt shows task bars for only Baseline, Baseline1, and Baseline2. It doesn’t display task bars for the current schedule.
To see different baselines or more baselines, you can modify your view in several ways. From the ribbon, you can display any baseline you want in any Gantt Chart view. Display the Gantt Chart view you want and then choose the Format tab. In the Bar Styles section, click the Baseline down arrow, and then choose the baseline you want to display. For example, if you display Tracking Gantt view, by default it uses Baseline for the baseline task bars. However, if you choose Baseline2 in the Format tab’s Bar Styles Baseline menu, the baseline task bars reflect Baseline2’s dates.
But what if you want a view to show task bars for Baseline1 through Baseline4 to evaluate trends over time? In that case, you can modify the view definition to do just that.
Here’s what the bar styles definitions look like when you add another baseline to the view:

And here’s what the view looks like with more than three sets of baseline bars.

The Set Baseline dialog box has a second option: “Set interim plan.” Unlike Project baselines, interim plans save only start and finish dates, not duration, cost, and work. Interim plans are a holdover from earlier Project versions, when the program offered only one baseline.
Even with the 11 baselines that Project now offers, interim plans may come in handy. If you import a project schedule from Project 2002 and earlier (it could happen), any additional baseline information ends up in interim plan fields (Start1/Finish1 through Start10/Finish10). You can copy that data from the interim plan Start and Finish fields (Start2/Finish2, for example) into baseline fields like Baseline2.You can also save interim plans as partial baselines in between the full baselines you save.
Don’t forget: for a chance to win a copy of one of my books, visit Erik Van Hurck’s blog, The Project Corner.
Below are some interesting links for you! Enjoy your stay...
O'Reilly 50% Ebook Deal of the Day
Microsoft Project blog
Scott Berkun's website
QuickBooks and Beyond
QuickBooks Online Blog
QuickBooks and Your Business